How to Add Payload CMS to Next.js Project
A step-by-step walkthrough of installing Payload, defining your content, rendering it, and deploying - based on setting it up on a real production Next.js site.
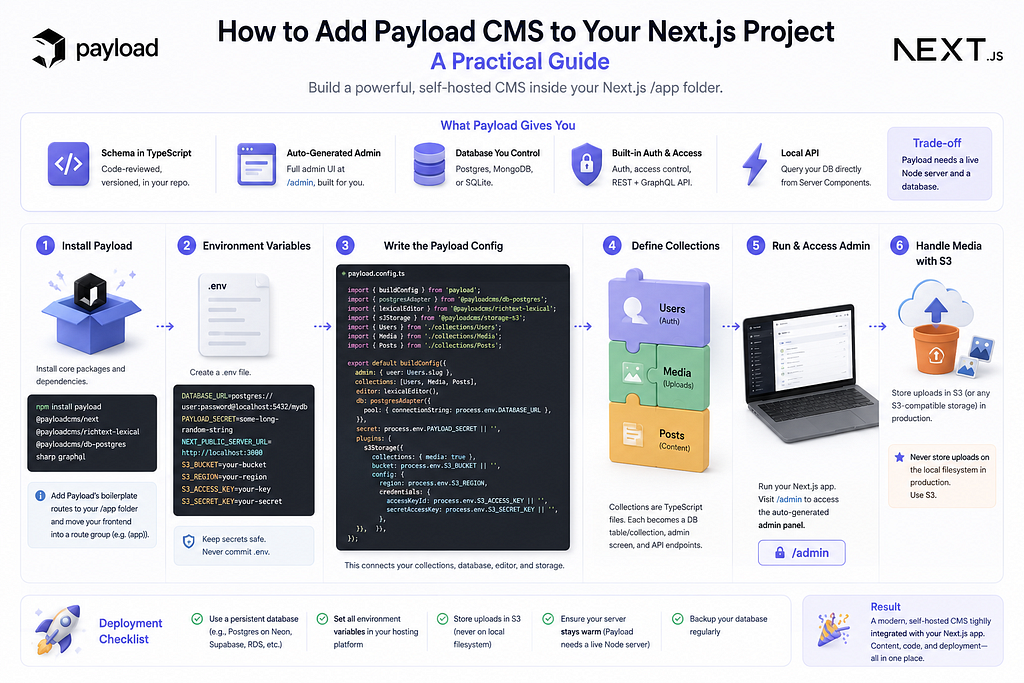
If you have a Next.js app and you’re tired of hardcoding content, editing JSON files by hand, or paying for a hosted CMS whose schema lives in someone else’s dashboard, Payload is worth a look. Payload installs directly inside your Next.js /app folder - no separate backend, no second server to deploy. Your CMS and your frontend live in the same repo and ship together.
This guide walks through the whole thing: prerequisites, installation, defining content, rendering it on your pages, handling media, and deploying. I’ll keep it practical and point out the places that trip people up.
What Payload actually gives you
Before the how-to, here’s what you get, so you know if it fits:
- A schema defined in TypeScript, living in your repo - code-reviewed in pull requests, versioned with everything else. No click-through dashboards.
- A full admin UI is generated for you at /admin, built automatically from your schema. You don't write it.
- A database you control (Postgres, MongoDB, or SQLite) - self-hosted, no per-seat billing, no vendor lock-in.
- Built-in auth, access control, and a REST + GraphQL API out of the box.
- A “local API” that queries your database directly from Server Components.
The trade-off: Payload needs a live Node server and a database. If your site is currently a pure static export, adding Payload means giving that up for at least your CMS-driven routes. That’s the main cost.
Prerequisites
You’ll need:
- A Next.js app using the App Router. Payload 3 installs into the /app directory.
- A database. Postgres and MongoDB are the two common choices; SQLite also works. This guide uses Postgres.
- Somewhere to store uploaded media in production - an S3 bucket (or any S3-compatible store). More on why below.
Step 1: Install Payload
The fastest way to start clean is Payload’s own scaffolder, which sets up a fresh Next.js app with Payload already wired in:
npx create-payload-app@latest
But if you already have a Next.js app - the common case - you add Payload to it manually. Install the core package plus a database adapter, the rich-text editor, and (if you handle image uploads) sharp:
npm install payload @payloadcms/next @payloadcms/richtext-lexical \
  @payloadcms/db-postgres sharp graphql
npm gotcha: if the install complains about peer dependencies, run it with npm install --legacy-peer-deps.
Payload also needs a handful of files placed in your /app folder - the routes that serve the admin panel and the API. These are boilerplate you copy once from Payload's blank template and never touch again; they simply import from @payloadcms/next. You'll typically move your existing frontend into its own route group (like (app)) so Payload's (payload) group can sit alongside it.
Step 2: Set your environment variables
Create a .env with at least these:
DATABASE_URL=postgres://user:password@localhost:5432/mydb
PAYLOAD_SECRET=some-long-random-string
NEXT_PUBLIC_SERVER_URL=http://localhost:3000
PAYLOAD_SECRET is used to sign tokens - make it long and random, and never commit it. Add your S3 credentials here, once you set up media (Step 6).
Step 3: Write the Payload config
This is the heart of it. Create payload.config.ts at your project root. It wires up your collections, your database, your editor, and any plugins:
import { buildConfig } from 'payload';
import { postgresAdapter } from '@payloadcms/db-postgres';
import { lexicalEditor } from '@payloadcms/richtext-lexical';
import { s3Storage } from '@payloadcms/storage-s3';
import { Users } from './collections/Users';
import { Media } from './collections/Media';
import { Posts } from './collections/Posts';

export default buildConfig({
  admin: { user: Users.slug },
  collections: [Users, Media, Posts],
  editor: lexicalEditor(),
  db: postgresAdapter({
    pool: { connectionString: process.env.DATABASE_URL },
  }),
  secret: process.env.PAYLOAD_SECRET || '',
  plugins: [
    s3Storage({
      collections: { media: true },
      bucket: process.env.S3_BUCKET || '',
      config: {
        region: process.env.S3_REGION,
        credentials: {
          accessKeyId: process.env.S3_ACCESS_KEY || '',
          secretAccessKey: process.env.S3_SECRET_KEY || '',
        },
      },
    }),
  ],
});
A collection is Payload’s word for a content type - posts, users, media, products, whatever. Each becomes a database table (or Mongo collection) and gets its own admin screen and API endpoints automatically.
Step 4: Define your collections
Collections are just TypeScript files. Here are the three from the config above.
Users - the auth collection. Payload needs one to gate the admin panel:
import type { CollectionConfig } from 'payload';
export const Users: CollectionConfig = {
  slug: 'users',
  auth: true, // enables login, tokens, password reset
  fields: [
    { name: 'name', type: 'text' },
  ],
};
Media - an upload-backed collection for images and files:
export const Media: CollectionConfig = {
  slug: 'media',
  upload: true,
  access: { read: () => true }, // publicly readable
  fields: [
    { name: 'alt', type: 'text', required: true },
  ],
};
Posts - your actual content, with a rich-text body and useful fields:
export const Posts: CollectionConfig = {
  slug: 'posts',
  admin: { useAsTitle: 'title' },
  access: {
    // logged-in users see everything; the public sees only published posts
    read: ({ req }) => {
      if (req.user) return true;
      return { status: { equals: 'published' } };
    },
  },
  fields: [
    { name: 'title', type: 'text', required: true },
    { name: 'slug', type: 'text', required: true, unique: true, index: true },
    { name: 'excerpt', type: 'textarea' },
    { name: 'heroImage', type: 'relationship', relationTo: 'media' },
    { name: 'body', type: 'richText' },
    {
      name: 'status',
      type: 'select',
      defaultValue: 'draft',
      options: ['draft', 'published'],
    },
  ],
};
Two things worth understanding here:
- access.read is your publish gate. Anonymous requests get filtered to published posts at the query level - drafts simply never leave the database for logged-out visitors. Logged-in editors see everything.
- relationship fields link one collection to another. heroImage points at a media document; you could point author at users the same way.
Step 5: Run it and create your first user
Start your dev server (npm run dev) and visit http://localhost:3000/admin. On first load, Payload asks you to create an admin user, then drops you into a fully-working editor for every collection you defined. No dashboard code written.
Payload also exposes, automatically:
- REST API at /api (e.g. /api/posts)
If you’re on Postgres in development, Payload uses Drizzle (ORM) to push schema changes to your database as you edit your config, so your tables stay in sync while you iterate.
Step 6: Render content on your pages
Because Payload runs inside Next.js, you can query it directly from a Server Component using the local API - no fetch, no HTTP hop, just a database call in-process. First, a cached client so you initialize Payload only once:
// lib/payload.ts
import { getPayload } from 'payload';
import config from '../payload.config';
let cached: Awaited<ReturnType<typeof getPayload>> | null = null;
export async function getPayloadClient() {
  if (!cached) cached = await getPayload({ config });
  return cached;
}
Then a blog page that fetches published posts:
// app/blog/page.tsx
import { getPayloadClient } from '@/lib/payload';
export default async function BlogPage() {
  const payload = await getPayloadClient();
  const { docs: posts } = await payload.find({
    collection: 'posts',
    where: { status: { equals: 'published' } },
    sort: '-createdAt',
    limit: 10,
  });
return (
    <ul>
      {posts.map((post) => (
        <li key={post.id}>
          <a href={`/blog/${post.slug}`}>{post.title}</a>
        </li>
      ))}
    </ul>
  );
}
If you’d rather keep your frontend separate (a different app entirely), you can hit the REST API instead - /api/posts?where[status][equals]=published, But the local API is the fast, native path when your frontend lives in the same app.
One caveat about rich text: Payload’s Lexical editor stores the body as a JSON tree, not HTML. To render it, use Payload’s official converter, convertLexicalToHTML from @payloadcms/richtext-lexical/html, or its React equivalent. Don't expect the body field to be a ready-made HTML string.
Step 7: Media belongs on S3, not local disk
This is the single most common production mistake, so it gets its own step. By default, Payload writes uploads to the local filesystem. That’s fine locally, but most modern hosts (Vercel, Railway, containers, anything that redeploys) have an ephemeral filesystem. Files written there vanish on the next deploy or restart.
The fix is the S3 storage plugin, already shown in the config in Step 3. Point it at a bucket, and Payload stores uploads there instead of on disk, where they survive deploys and can be served through a CDN like CloudFront. Set it up before you go to production, not after you lose your images.
Step 8: Deploy
A few things to get right when deploying a Payload + Next.js app:
- You need a live Node server and a reachable database. Payload can’t run as a static export. Point DATABASE_URL at your production Postgres and make sure the server can reach it.
- Set every environment variable on your host. PAYLOAD_SECRET, DATABASE_URL, and your S3 keys all need to be present in the deployed environment. A missing one usually surfaces as a confusing database or storage error at boot.
- Watch your platform’s size limits. If you deploy somewhere with a bundle-size cap (AWS Amplify caps SSR output at 220MB, for example), set output: 'standalone' in next.config.js. That traces and bundles only what's needed at runtime instead of shipping all of node_modules.
Wrapping up
The appeal of Payload in a Next.js project is that your content stops being a black box on someone else’s server and becomes part of your codebase: schema in TypeScript, reviewed in PRs, deployed with everything else, backed by a database you own - and you get a full admin UI for free. The price is that you take on a real backend: a live server, a database, and somewhere durable to keep uploads.
If you already run Next.js and are comfortable with a database and an S3 bucket, that’s a very reasonable trade, and the whole thing lives in one repo, ships in one deploy, and answers to one set of access rules.